Rug of the Month: May 2024

Last month Ania spoke about the first scroll in her “Missing Scrolls” project. This month, she’s talking about the second scroll. The second scroll is featured in the middle of the pattern, and was hooked in #3 cut wool. The pattern was designed by Jane McGown Flynn, and is 22″ x 11″. You can also read about the background on the project as a whole in that first blog post, available here.

Scroll on below to see more images of the completed “Missing Scrolls” project, and to read about the completion of the second scroll:

How did you approach color planning for the center scroll?

I dyed all of the wool for this scroll, and I had to preplan how I was going to hook it. It was hooked with dip dyed wool, where each piece of wool was dyed to run from the lightest to darkest color.

I decided on three different dip dyes, and I settled on including the apricot, green, and blue featured at the tip of each scroll because those wool colors are no longer available for purchase. Once I decided on the colors I would use, the planning was pretty straightforward, because I used each color in a simple pattern – I hooked a blue scroll, and then an apricot scroll, and then a green scroll, and then back to blue and so on.

What was the biggest challenge with hooking this scroll?

This scroll was very labor intensive. When I was still in the planning stages, I had to hook the longest scroll from it’s tip to it’s bottom to determine how much wool I needed to dye for each of my dip dye pieces. Dyeing dip dye wool itself is also pretty labor intensive.

The biggest challenge though, was this scroll really wanted to go on its own journey for what it would look like. I needed to loosen my conscious control over what the finished pattern would look like. Once I decided on the order of the colors to hook, the scroll really developed on it’s own. All I had to do was pull the loops. I had to let the scroll take the lead on the journey!

Is there anything else you’d like to note about this scroll?

The background is hooked in a checkerboard with a spot dye. I had seen this background done in a floral pattern in a rug that Jane McGown Flynn had in the rug show. Jane’s finished background was in green, and it looked like velvet, which I thought was beautiful. I was curious how the same technique would look with a spot dye wool. I think it came out really nicely.

As always, if you have any questions or comments, please leave them in the comments below!

Rug of the Month: April 2024

For April’s blog post, Ania is speaking about a recently finished project, “Missing Scrolls.” This pattern was designed by Jane McGown Flynn. It was hooked in three different cuts – the middle scroll was hooked in #3 cut wool, the scroll with the dark background in #4 cut wool, and the primitive scroll in #5 cut wool. The finished rug is 22 ” x 11″.

The three scrolls featured in this rug are so different, that Ania has decided to focus on them one at a time, in three separate blog posts. Look below to see an image of the finished project, and to read about the first scroll, designed and hooked in a primitive style:

What is the background on this project?

One day in class, I told Betty McClentic, who was my teacher, that I was in between projects. Betty immediately told me that she knew what I could work on. She began explaining to me that years ago, all McGown Teacher Workshop participants were required to hook a scroll sampler that included three additional scrolls that the current scroll sampler doesn’t have anymore.

Betty recommended that I reach out to Melissa Pattacini at Honey Bee Hive Rug Hooking, to ask about getting a pattern of the three missing scrolls from the current Scroll Sampler. Melissa knew what I was talking about, and was able to draw the pattern for me on rug warp. That’s also the reason for this pattern’s name – “Missing Scrolls.”

How did you approach color planning this scroll?

This scroll is in a primitive style. I wanted to take a basic, simple approach to it, as a result. I immediately knew I wanted to use a paisley wool in it. The center vein is therefore hooked with a paisley shawl that I had kept in my stash for many years. I really like how it looks, but I did not like hooking with paisley. The wool was full of very small threads that were easy to pull – I was constantly trimming the ragged edges.

I used a texture to outline the outside of the scroll too, and then I used a variety of yellow leftover wool to hook the remainder of the scroll. The background is also hooked in leftover wool. I like how the colors came together.

Anything else of note about this scroll?

I won’t be adding any more paisleys to my stash! It’s not a fabric that I enjoy working with. I’d also mention that this is hooked in a #5 cut wool, and that is the biggest cut wool that I would recommend using on rug warp. I like rug warp for projects that require fine shading. However, the same aspects of rug warp that make it great for fine shading, namely how stiff and strong it is, make it difficult to use with thicker cuts of wool.

Hooking this scroll was simple, and it came together quickly. This is the simplest type of scroll you could hook. It was the second scroll I hooked in the pattern. Next time, we’ll talk about the first scroll I hooked in this pattern, the center scroll.

If you have any questions about this scroll, feel free to leave them below!

Rug of the Month: February 2024

February’s Rug of the Month is putting the spotlight on one of Ania’s recently finished projects. The project is hooked on a pattern called “Nuts,” which was designed by Faith Williston. It’s 16″ x 16″, and it was hooked in a # 8 cut wool.

Read on below to learn more about this project and to see images of the completed rug:

Why did you decide to hook this pattern?

I never in my life thought I would hook a squirrel. I am not a fan of squirrels! They harass my dog and dig up my garden. We have a lot of squirrels in our area too – grey ones, black ones, and even some brown ones. This was a very unlikely topic for me to work on. However, at Teacher’s Workshop, Margaret O’Connor was the teacher I was most interested in taking a class with, and her class was on this pattern.

I was interested in working with Peggy because I knew she was a good teacher from a previous class I had taken with her, and because I wanted to learn more about her wool dyeing process. All the wool for this rug was dyed using natural dyes. That is something I don’t do, and I was very, very curious to learn more about it. I hadn’t previously worked with naturally dyed wools.

How was this project color planned?

It was entirely based on the wool that Peggy had dyed. She used chestnuts, walnuts, and a variety of other natural plant dyes to create these colors. I was impressed by the variety of browns she was able to produce, and the vibrancy of the mulberry background.

What was your favorite part of working on this project?

I liked how much detail I could incorporate into such a small piece with such a large cut. I also tend to look more favorably on squirrels now, after completing this piece. I even learned something new about squirrels – both Presidents Harding and Truman each had pet squirrels while in the White House.

Peggy did a wonderful job talking about dyeing with natural materials. If people are interested in that topic, I would highly recommend inviting her to speak with your guild.

If you have any additional quesitons, feel free to leave them below!

Tips and Tricks: the Pros of a Soft Pencil Over a Sharpie

When drawing patterns, it’s easy to make minor mistakes. When you’re in “production mode”, and in the zone of following the lines, it’s easy to overlook that one motif wasn’t drawn, or a line in the border was missed. I’ve made these mistakes myself while drawing patterns and I’ve noticed them in patterns that I’ve purchased as well. It happens to everyone!

That is why, as a teacher and a rug hooker, before a project is started, I really analyze the pattern that is being hooked. I analyze the pattern to ensure it’s complete: all the motifs are present and finished, the lines all make sense, and there aren’t any unexpected gaps. I also check if the pattern is drawn on the straight of the grain. I do that at the start of projects, because it helps me kickstart the creative process. I start thinking about how I’m going to approach specific details in the motifs.

a sample of a floral motif drawn in sharpie – the motif is incomplete

I also do this analysis before starting hooking because I want to correct any mistakes that I do find. It’s easiest to do that before hooking, because once you start hooking, the focus becomes on pulling loops and following lines and applying colors. It’s just as easy to miss the mistake when hooking as it was when drawing the pattern initially.

an example of one of Ania’s patterns where she had to make adjustments with a sharpie, multiple times

When making modifications or corrections to a pattern, many rug hookers will pull out a sharpie to do so. I think a lot of people chose to do so because we use sharpies to draw patterns in the first place, and we want to ensure the adjustments are visible. The problem with sharpies is that they are permanent. So, you need to make sure that what you’re drawing is exactly what you need, otherwise it complicates the pattern even more. If you make mistakes, the process of hooking the rug becomes much more confusing. On a separate but related note, sometimes people use different colored sharpies to help them color plan a pattern. The concern with that is I’ve found that the marker can bleed onto light value wools over time.

the flower motif from earlier has now been completed with an 8B pencil

What I recommend using to make these adjustments and notes is an 8B pencil. They’re used for drawing and sketching, and you can purchase them at any art store. They’re relatively inexpensible (less than $3), and invaluable for what they offer to my rug hooking projects! Since the lead in these pencils is soft, they’re easy to use on linen and other backing material, and the lines they draw are very visible. If I make a mistake, all I need is a soft pencil eraser or a damp cloth and the mistake is easily removed. Once I’ve made all of my corrections, that’s when I go back over the pencil with my sharpie.

As always, if you have any questions for Ania, feel free to leave them in the comments below!

Happy Holidays!

As has become tradition, our December blog post features one of my hand-made ornaments. You can look at previous years ornaments in our December archives, or our most recent ornaments are linked here, and here, and here.

Scroll on to see an image of this year’s ornament (with an extra handmade ornament thrown in for good luck!), and to read a brief message about the New Year!

Next year is shaping up to be a busy one, and I’m planning on traveling to teach at rug schools and workshops all the way from Maine to West Virginia, with stops in New Jersey, Massachusetts, and Maryland in between! I hope to see you in-person at one of those schools. If you’d like to learn more about any of those events, please feel free to reach out with questions!

In the meantime, I’m happy to get some rest and relaxation this holiday season with family. I hope you have a happy holidays and a fantastic New Year!

A Refresher on Strip Sorters

Back in the summer of 2020, we posted a tips and tricks post on this blog that was focused on how to use strip sorters in an unconventional way to better organize wool. I was thinking again about how useful I find this trick in my own hooking, so I’ve decided to revist that post for this month’s blog post. If you’d like to revist that tip as well, read on below!

I’ve had to come up with some creative ways to sort my wool, depending on the demands of my projects and the spaces that I needed to work in. I’ve used a variety of sorters for that task, and I’ve found that I really like one particular style of sorter: one piece Sally sorters.

DSC_0556 watermarked
Darlene’s one piece Sally sorter.

I really like Darlene Pezza’s Sally sorters in particular. These sorters are a really great tool. They are very well made and well designed. Each sorter can fit 8 values. They can fit a large number of strips and a wide variety of cut sizes. Another benefit to these sorters is they don’t require elastic bands, which have a tendency to get brittle and break over time, as some other strip sorters require. 

DSC_0550 watermarked
Typically, hookers will use one sorter for one color, like above.

These sorters are also uniquely well suited to one of my favorite tricks when it comes to using sorters: storing two separate colors for one project on one sorter.

The first time I did this, it was because I had limited space where I was working and it was simply easier to have one sorter with me instead of two. I like to run one color along one side of the sorter, from the lightest value to the darkest, and then flip the sorter over and run the other color along the opposite side, so that the lightest value from the second color shares the same space as the darkest value from the first color.

DSC_0563 watermarked
Looking at the first side of the sorter allows you to focus on your first color.

I quickly realized that this method of storing wool has the added value of showing you what the relative value of each wool you’re working with is. When you line up the values of two colors this way, it becomes much easier to see what the middle tones of each wool is, and how they compare with each other.

DSC_0569 watermarked
…by flipping the sorter over, you can focus on your second color.

I bought my sorters from Pam Bartlett. If you’re interested in these sorters for yourself, they’re available from her at the Woolen Pear (located at 166 Mudgett Hill Rd., Loudon, NH), or online at Red Horse Rugs. If you’re interested in carrying these sorters in your own store you can contact Darlene for wholesale inquiries at dmpezza@verizon.net, and let her know where you found out about her sorters!

Rug of the Month: Water Iris and Lilies

For October’s rug of the month, Ania is chatting about her “Water Iris and Lilies” rug. This pattern is 27″ x 27″. Ania created the pattern based on the lower third of the Sumner Memorial Window in the First Church in Albany, NY. The glass window was designed by Agnes Northrop at Tiffany Studios.

Read on below to learn more about this project.

What inspired this pattern?

I drew this pattern during the pandemic, in June 2020. I’ve always been a big fan of Tiffany windows. I especially liked the irises in this particular window, and I thought dyeing for and hooking a waterfall would be a nice challenge.

The irises reminded me of when I was a little kid. There were irises growing in the garden of our landlord. Irises were the subject of my first “scientific experiment” as a child – I went out with a dixie cup to try to figure out why they drank water through their “feet” and not their “mouths.”

How did you approach color planning?

I based the color planning on the original window. The irises in the window have violets and purples, but they’re also tinged with pinks and a faint green, which I thought was interesting and I incorporated it into my own rug too.

I also wanted to use up as much wool as I could from my previous rugs, which included my Tiffany Peacock rug. A lot of the blues that I used in this project were originally dyed for that earlier rug.

I dyed specifically for the waterfall though – I decided on a modified spot transition dye. I needed to have a dynamic flow of water that also had highlights of water spray included. That gave the appearance of a very fast flowing waterfall, which the original window had. I think the modified spot transition achieved that.

What was the biggest challenge with hooking this project?

My biggest challenge was working out how best to frame the finished rug and coming down to deciding whether or not to include a black frame around the rug. The original window doesn’t have a black frame around the section I based my pattern on. I ultimately decided to include it because I wanted to isolate that portion of the window as a theme all to itself.

If you have any questions, feel free to leave them for Ania below!

Rug of the Month: September 2023

For September’s rug of the month, we’re featuring Ania’s “Antique 1940″ rug. The pattern is by Melissa Pattacini, and it measures 18″ by 18”. Ania hooked it in #5 strips of wool. This project is a fun one, because as you can see from the images below, Ania turned the finished rug into a bag.

Read on below to find out more about how this project came together.

What was the inspiration for this project? When did you decide to turn it into a bag?

The inspiration for this project was sourced by looking through my UFOs (unfinished objects). I had a number of unfinished rugs and I wanted to start tackling them. I started hooking this particular pattern in 2017 at Northern McGown Teachers Workshop, in a class by Ellen Dolmetsch.

This unfinished project caught my eye again because I really liked the blue and yellow color scheme. I thought it was the perfect color scheme to use with my handmade metallic wool, to give it a little bit of bling. Ironically, I’ve been making the metallic wool for years, but this is the first time I used some of it in my own project.

The inspiration to turn this into a bag came from Ellen – she had converted her piece into a tote bag. I thought it was a great idea to have a bag featuring a hooked piece I had made.

How did you create the bag?

I used instructions from Cindy Irwin found in a book titled Hooked Carpetbags, Handbags, and Totes, presented by Rug Hooking Magazine, and published by Ampry Publishing.

How did you approach color planning for this project?

Ellen made the decision to offer blue and yellow 8 value swatches of wool for her students when teaching this rug. So, I got the wool from Ellen, and it was a pretty straightforward choice. When I decided to pick up this project again, I also selected one blue and one gold metallic wool from my own collection as accents. I used the metallic wool in the center motif, to bring attention to it.

Is there anything else of note that you’d like to mention about this project?

I like that the bag has brass feet to elevate it and help protect the bottom when you use it. If you’re planning on making your own bag, I would very highly recommend adding feet to the bottom.

The rug is big, which means the bag is big too. I really like using it to carry a hooking frame, for example.

At the end of the day, I have a finished UFO, which I’ve made into my first ever tote, which I now can use on all my rug hooking adventures. That’s a great success, in my book!

If you have any questions for Ania, feel free to leave them below!

A Refresher on Measuring Custom Dyed Whipping Yarn

I was recently reminded of the unique challenges that come from measuring custom dyed whipping yarn. This is a topic we’ve already tackled via a tips and tricks blog post back in August 2018, so I wanted to return to that post and share a refresher. If you’d like to revist a tip on measuring yarn for whipping, read on below!

For most of my rug hooking career, when it came to whipping rugs, I’d buy a skein of yarn and run with it. Recently, I’ve taken a different approach by hand dyeing my whipping yarn. With the new approach is a new conundrum: how much yarn do I need to dye? I want to ensure I have enough yarn for the project, without dyeing so much that I need to invent another reason to use it.

After a little bit of experimenting, I’ve come up with a method to help determine just that; just folow these steps to estimate how much yarn you’ll need to dye to finish your project:

dsc_0480-a watermarked
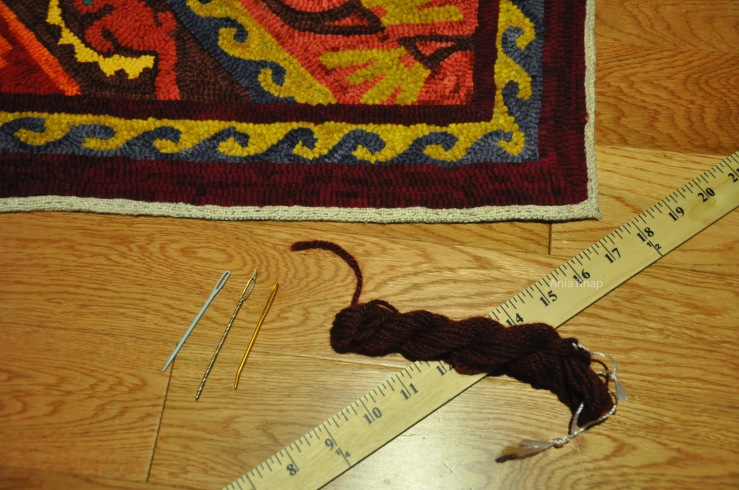
Here are some of the materials that will be needed for this project – a hand dyed mini skein of yarn, a yard stick, a variety of needles, and your rug!

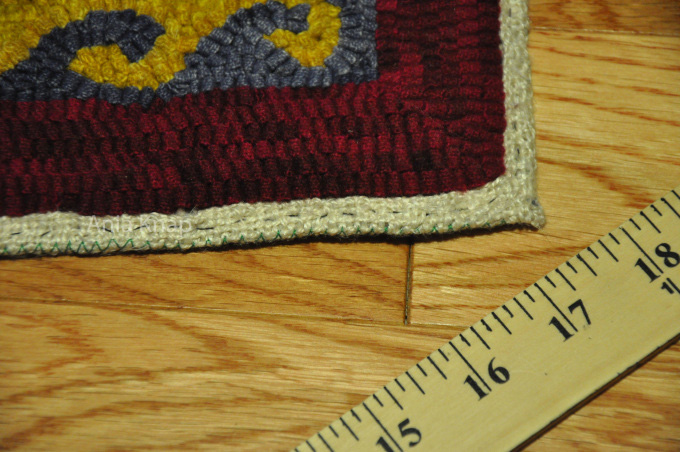
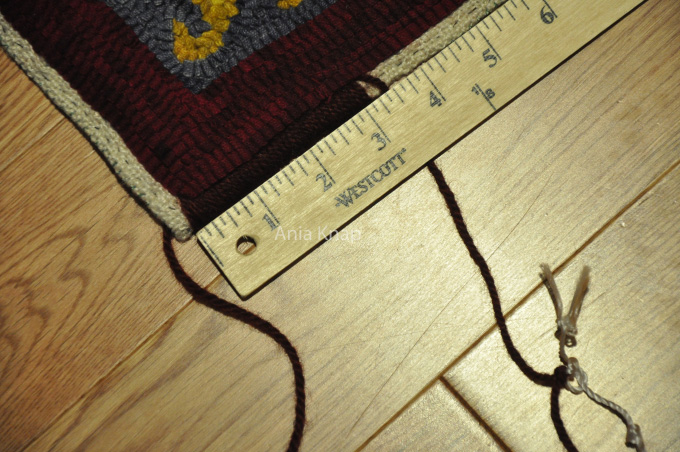
Step 1: After you’ve finished hooking your pattern, pressed it, and trimmed the backing, turn it over so that you have a half inch edge. I use a simple running stitch to keep the folded edge in place.

NOTE: The wider or narrower your edge is, the more or less yarn you’ll need to whip your rug.

dsc_0482 watermarked
Here is my turned edge, with a running stitch through the middle of it to keep it in place.

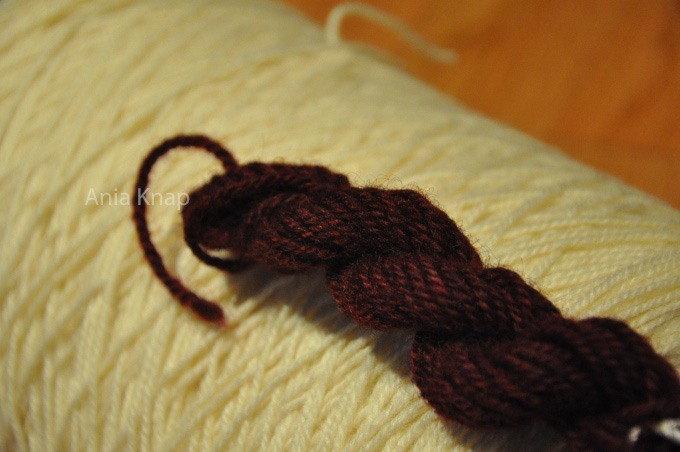
Step 2: When you hand dye your whipping yarn, you often work from a very large skein of yarn. To help determine which color I want to dye my yarn, I make a mini skein from my larger skein of whipping yarn, and use that to play around in the dye pot. I use this hand dyed mini skein to help determine how much yarn I’ll need to finish my entire project.

NOTE: When you’re dyeing your own yarn, you will need to account for shrinkage in your measurements. In my experience, I’ve noted a 2% shrinkage when dyeing a three ply 100% worsted wool yarn.

dsc_0484 watermarked
Here is my hand dyed mini skein, resting on top of my much larger skein of whipping yarn.

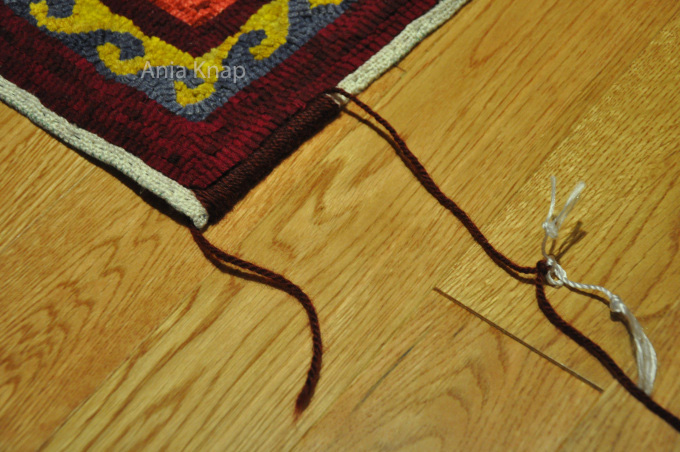
Step 3: Measure out four feet of yarn from your mini skein. I suggest marking the measurement with a knot, instead of cutting the yarn, to help avoid wasting your materials. Whip stitch along your rug as you normally would, leaving a six inch tail at the start. Continue your whip stitch until you have a six inch tail left. You should have two six inch tails, one at the start and one at the end of your whipping.

dsc_0494 watermarked
I used four feet of yarn from my mini skein (marked with a knot!) to whip my edge.

Step 4: Measure how much whipping resulted from your four feet of yarn. For this project, one yard of yarn (i.e. four feet minus two six inch tails) resulted in three inches of whipping. That made the math easy!

I could count on approximately one foot of yarn resulting in one inch of whipping. If the edge on your rug is narrower or wider than half an inch, ‘your mileage may vary’ on how far you get with four feet of yarn.

dsc_0497-e1534293344556 watermarked
Three inches of whipping!

Step 5: Measure the outer edge of your rug, so that you know the exact length that you will need to whip. My rug was 162 inches around.

Step 6: Do the math! For my project, one foot of yarn resulted in one inch of whipping, and so I’ll need at least 162 feet of yarn.

We also need to take into account the shrinkage from dyeing the yarn, that corners require more yarn, and that I also like to have a little bit of extra yarn put away just in case I need to complete repairs. So, I decided to dye an additional 10% of my yarn, resulting in a final total of 180 feet of yarn for this project.

Step 5: Measure out your yarn, dye it, and whip away!

If you have any questions on this process, feel free to comment below!

Rugspirations: a Great Conversation Featuring Ania!

Earlier this week, Ania sat down with Robin Whitford of Hooking Outside the Lines, to take part in one of Robin’s Rugspirations talks. You can listen to (and watch!) the full interview on YouTube.

Robin’s Rugspirations series is focused on introducing her audience to modern rug makers. Ania and Robin had a great conversation about how Ania got started in rug hooking, what her rug hooking journey has looked like, and her teaching.

Ania and Robin during their conversation!

Robin is from Ottowa, Canada, and she is a passionate textiles artist, mostly focused on rug hooking and Oxford punch needle art. Ania and Robin first met when Robin was a participant in a workshop Ania taught at Green Mountain Rug Hooking Guild Rug Show last November.

Ania’s interview is Robin’s 20th, and so once you’ve watched it, there are 19 other conversations Robin has had that you can explore as well! Take a look and tell us what you think in the Comments below.